

 portable tandoor
 A tandoor is an clay oven of the type used in India and Pakistan. The oven is heated by lighting a wood
or charcoal fire in the base and this heats the clay body of the oven. Once the fire has died to
embers food is cooked on long skewers which are lowered through the top opening. Naan bread is cooked
by sticking the moist dough to the inside walls of the oven. This project was to design a tandoor
which could be built by members of the Kent Potters Association at a one-day workshop.
A tandoor is an clay oven of the type used in India and Pakistan. The oven is heated by lighting a wood
or charcoal fire in the base and this heats the clay body of the oven. Once the fire has died to
embers food is cooked on long skewers which are lowered through the top opening. Naan bread is cooked
by sticking the moist dough to the inside walls of the oven. This project was to design a tandoor
which could be built by members of the Kent Potters Association at a one-day workshop.
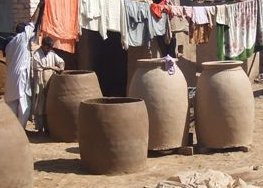
 A genuine tandoor can be around 1.5m high, and is constructed from a mixture of terracotta clay
and animal dung. The dung provides vegetable fibres which help provide strength to the unfired
structure, assist it to dry evenly and burn during the initial firing, which is done slowly
over several days.
A genuine tandoor can be around 1.5m high, and is constructed from a mixture of terracotta clay
and animal dung. The dung provides vegetable fibres which help provide strength to the unfired
structure, assist it to dry evenly and burn during the initial firing, which is done slowly
over several days.
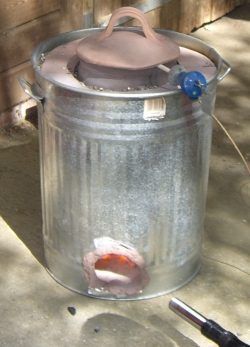
We needed something which would be much more compact, build-able in a day and fire-able in a (separate) day. I decided to go for a construction which would fit in the sort of galvanised dustbin available from hardware and DIY stores. This would take the clay oven and could be packed with vermiculite insulation to make it efficient and safer to use. As a base we would use a kiln shelf.
In order to be able to fire the tandoor fairly quickly I substituted a grogged crank stoneware clay suitable for Raku pottery. I took a bag of terracotta clay and measured out about the same volme celulose fibre. I dampened the fibre and then wedged it into the clay, effectively making a paper clay. I let the mix dry out for a couple of days, wedged it up and at the suggestion of my sister christened it 'faux poo'.
construction
 To start the workshop we wedged the 'faux poo' together with the crank in a ratio
of 1 of poo to 4 of the crank. We wedged a total of three bags of crank, so we ended up with
about 45Kg of clay ready for use. In the end I think we used about 35Kg of that.
To start the workshop we wedged the 'faux poo' together with the crank in a ratio
of 1 of poo to 4 of the crank. We wedged a total of three bags of crank, so we ended up with
about 45Kg of clay ready for use. In the end I think we used about 35Kg of that.
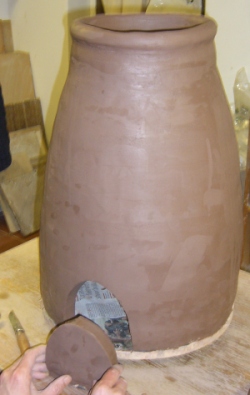 We constructed the main body of the tandoor upright, starting from the bottom on the
kiln shelf, which we covered with a double layer of newspaper. We went right to the edge
of the shelf on the basis that the clay would shrink as it dried and again as it is
fired. (I allowed 10% total shrinkage on my drawings) In fact, because of the
paper and grog content of the mix the shrinkage on drying was less than I would have expected.
We constructed the main body of the tandoor upright, starting from the bottom on the
kiln shelf, which we covered with a double layer of newspaper. We went right to the edge
of the shelf on the basis that the clay would shrink as it dried and again as it is
fired. (I allowed 10% total shrinkage on my drawings) In fact, because of the
paper and grog content of the mix the shrinkage on drying was less than I would have expected.
No water was used to join the flattened coils of clay, but they were well thumbed together and then beaten to retain the correct shape. We built for about an hour and a half and then took a break for lunch. We assisted drying a little with a paint stripping gun and then continued upwards, finishing with a thick roll of clay to make the opening.
An opening was cut in the base for stoking the fire and raking ashes. A lid and two rings of tiles were made separately, and these were biscuit fired when bone dry in a normal kiln to around 1000°C.
initial firing
 After a week we placed the tandoor on a folded bed sheet and lowered it into the bin. I cut
away any of the sheet I could get to and presumed that the remainder will burn or carbonise away in the
first firing. It was then allowed to dry in the bin for a further seven weeks. The night before
firing a large candle was lit inside to get it slightly warm and ensure any remaining moisture was
driven off.
After a week we placed the tandoor on a folded bed sheet and lowered it into the bin. I cut
away any of the sheet I could get to and presumed that the remainder will burn or carbonise away in the
first firing. It was then allowed to dry in the bin for a further seven weeks. The night before
firing a large candle was lit inside to get it slightly warm and ensure any remaining moisture was
driven off.
On the morning of the firing a hole was let into the galvanised bin, corresponding to the stoking hole we cut during construction. The gap round the hole was plugged with fresh clay both inside and out, and the space around the liner then filled with vermiculite.
We set as small a fire as we could, with a lighter and just a few pieces of charcoal. The aim was to raise the temperature as slowly as possible in the first hour, so we fed it a piece at a time. After half an hour we started adding the charcoal a little faster, aiming for a rise of 150-200°C per hour.
After an hour and a half the temperature stabilised at about 250°C as measured by a pyrometer tucked just under the lid. The fire on the base of the oven would just not draw enough air to get the temperature up. To get it higher we used a vacuum cleaner set to 'blow' to force air into the inlet. We had to set it well back from the inlet, and at an angle so that the air swirled around. The problem then was that the temperature rose very quickly indeed and before we realised it we were at 500°C. This rapid rise caused a couple of small cracks to develop, which we felt would not have happened if we had managed the this stage so that it went up slower.
The temperature stuck for a while at about 550°C. We were able to stoke it by throwing charcoal into the entrance, where it would be caught by the stream of air and pushed into the oven. To get it to rise again we opened the lid a little more and raked the coals. The temperature then rose in stages and sometimes would drop back until we changed something. We should have protected the pyrometer better from the gasses escaping from under the lid. Near top temperature it was enough to melt the alloy shield around the probe! We hastily cut some pieces of lightweight kiln brick to protect it. It finally to peaked at 870°C The entire firing took about six hours.
cooking
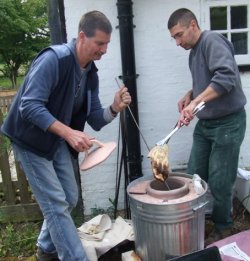 The site we picked for the cooking was quite sheltered - and as a result we found it hard to get
the fire going in the tandoor. Out came the vacuum cleaner set on 'blow' again. We built up a good
layer of burning charcoal about 10cm thick over the base of the oven and let that burn down. This
took about an hour. Then we started with the naan bread.
The site we picked for the cooking was quite sheltered - and as a result we found it hard to get
the fire going in the tandoor. Out came the vacuum cleaner set on 'blow' again. We built up a good
layer of burning charcoal about 10cm thick over the base of the oven and let that burn down. This
took about an hour. Then we started with the naan bread.
I tried the technique I remember seeing on the Generation Game TV programme from my youth of slapping the dough out between my hands - but in the end resorted to a wooden board and roller, with a little flour to ease the stickiness. To my amazement it stuck well to the inside of the oven and we put the lid back on about 3/4 of the way over. The bread cooked in about 5 mins. Then came the game of getting it out of the oven. This was the trickiest part of the operation. I dropped one right in trying to use the traditional spike and scraper tools. In the end it took two of us with a combination of those and barbecue tongs to get them out in one piece. I feel a new tool design coming on!
Because we were experimenting with the naan we cooked each one separately. As a result the oven cooled a lot in that time. We loaded up the lamb onto four skewers and in they went. The temperature was less than ideal and we left them in for about half an hour. A sample from near the top seemed cooked through but when we took the skewer out the meat further down was red rather than pink so it went back in for another 10 mins. It was then nicely done and everyone agreed it was tasty and succulent. Something to do with Stephen having provided meat from his own organically reared rare breed sheep I suspect!
We stoked the fire up and applied air before loading in the chicken. Again we did four skewers, and it was in fairly big chunks. Although we now had more of a fire in the bottom we didn't really give the clay body a chance to heat through. The result, however, was that the chicken seared quickly on the outside and then cooked slowly over about 45 mins. It was soft, moist and delicious - although we agreed that the chili peppers in the marinade had been hotter than expected and so the result was more spicy than normal for tikka chicken.
conclusion
A plan for the oven we built can be downloaded as a PDF file here. I would suggest that multiple air inlets, or a way of getting air to the coals from underneath and controlling the air flow are necessary if the oven is to be used without forced air.
Thanks to Sue and Stephen Neal for use of their home for the building, firing and cooking, and
for providing the sheep and naan dough. Mr Majid of Fresh Cuisine Indian take-away restaurant for the
gift of the tandoor skewers. Photos of tandoor building in Pakistan and the cooked naan bread courtesy of
Jane Gibson. The plans are released under the Creative Commons licence - which essentially means that you
can use and reproduce them provided you include a credit.
